Announcements Carol's latest book, Gluten-Free Cooking for Two, is now available. Designed for small households, each perfectly-proportioned recipe serves two people. You will eliminate unwanted leftovers and reduce waste when you cook right-size meals with the 125 recipes in this book. Enjoy!!
Celebrate with me!!! Gluten-Free Cooking for Two has won two awards: named one of ten "Best Gluten-Free Cooking Books in 2017" by Healthline.com and won a Silver Medal in the 2017 Living Now Book Awards in the "Natural, Nutrition, Organic, Vegetarian" category.
Where in the World is Carol? Carol's in the kitchen, cooking up recipes for her next cookbook and www.CarolFenster.com
Watch for Carol on "Creative Living with Sheryl Borden," a PBS-TV show airing on your local PBS station during 2017-2018.
Join Carol at the National Western Complex, Expo Hall level 2 in Denver on April 21,10:30 am during the GFAF Expo Conference. See you there!
|
By Carol Fenster, on January 31st, 2017
 Gluten-Free Southwestern Chili for a Super Bowl Party. I always say “simple is better,” especially when entertaining. Whether you are hosting a Super Bowl party this coming weekend, or just want a super-easy menu for a cold winter night, this flavorful, naturally gluten-free menu is sure to be a hit. It has simple ingredients and is easy on the budget.
My motto, especially for beginners, is: “Stick to simple gluten-free recipes with gluten-free dishes that everyone recognizes and serve them in a simple way.”
That way, you can be the confident host or hostess and enjoy your own party, without worry.
Gluten-Free Super Bowl Menu
~Southwestern Chili~
~Plate of fresh vegetables and basket of corn chips~
~Guacamole and Mexican Salsa Dips~
~Cornbread~
~Chocolate Brownies~
~Your favorite beverages~
Southwestern Chili
Adapted with permission from Gluten-Free 101: The Essential Beginner’s Guide to Easy Gluten-Free Cooking by Carol Fenster (Houghton Mifflin Harcourt, 2014)
This easy chili dates back to my childhood, but I have been tweaking it for several years to reflect my family’s changing tastes. We like it even better and, for added color and flair, have a plate of shredded cheese, sliced avocados, chopped green onions, and maybe a few halved grape tomatoes so guests can add their own garnishes. They will love it!
1 pound lean ground beef or turkey
1/2 cup finely chopped onions
2 cans (15 ounces) pinto or kidney beans (or both), rinsed and drained
2 cans (15 ounces) canned tomatoes
1 large garlic clove, minced
2 teaspoons chili powder (or to taste)
1/2 teaspoon ground cumin
1/2 teaspoon ground coriander
1/2 teaspoon dried oregano
1/2 teaspoon salt (or to taste)
1/4 teaspoon sugar
1 cup water (or more)
In large Dutch oven or skillet, combine ground round and chopped onion. Cook over medium heat until meat and onion are gently browned. Add remaining ingredients and bring to a boil. Add enough water to reach desired consistency. Cover and simmer on low heat for 2 hours. Refrigerate overnight. Or, prepare the morning of the party and cook in slow cooker for 4 to 6 hours. Serve with shakers of additional spices near the slow-cooker for those who want to spice it up. Serves 6 (can double or triple)
Carol’s Tips for Hosting a Super Bowl Party
[1] Choose a simple menu that is also dairy-free, since lactose-intolerance often occurs with gluten-intolerance. Stick with high-flavor, straightforward dishes that you know how to prepare and that your guests are familiar with. It’s better to serve a simple, flavorful dish that you know how to prepare than attempt a new, complicated dish that might not meet your expectations.
[2] Plan a menu that can be cooked-ahead―preferably the day before the party (or that morning)―and then reheated before the party. I cook this chili the day before, then refrigerate it overnight to let the flavors meld. It doesn’t need thickening, so there is no conundrum about which gluten-free thickener to use instead of wheat flour. Reheated on party day and served in a slow-cooker (or cooked in the slow-cooker all day), it stays hot throughout the party.
[3] Serve a simple gluten-free bread that appeals to everyone. One of my favorites is a moist, homey http://savorypalate.com/index.php/gluten-free-cornbread/[cornbread] which goes well with chili. Bake it on the morning of the party, cut into serving pieces earlier in the day, and pile high on a platter. Wrap in plastic wrap until party time to avoid drying out.
[4] Choose easily-served desserts. Luscious layer cakes are pretty, but require your full attention when cutting and plating―which takes you away from your guests and the TV. Instead, serve “grab and go” desserts such as gluten-free cookies (store-bought if you’re not a baker) or http://savorypalate.com/index.php/carol-fensters-chocolate-brownies/ [Brownies] served on big platters. That way, guests serve themselves whenever they please, freeing you to focus on your favorite team.
[5] Make it easy for you and your guests. Serve the Southwestern Chili in a slow-cooker which allows guests to help themselves whenever they please. Place additional spices nearby for those who want to jazz it up a bit. Instead of bowls, use tall coffee cups so guests can balance food on their laps while watching TV―the cup’s narrow tops reduce spills, handles make hot soup easier to hold, and a spoon stands upright in tall cups so no need for saucers. Arrange gluten-free cookies or pre-cut brownies on a platter so guests can help themselves―and you won’t have to do any last-minute serving of dessert and possibly miss that game-changing touchdown.
Enjoy the game and may your favorite team win!
By Carol Fenster, on January 18th, 2017
Years ago, I was a faithful watcher of the Lynette Jennings Design Show on the Home and Garden Network. As its title suggests, it was about home decorating. But the thing I remember most was— after Lynette made or showed us something that was wonderful in itself—then she make it even better with a decadent, over-the-top addition. She called it “gilding the lily.”
 Pumpkin-Chocolate Marbled Loaf with Orange Glaze Apply “Gild the Lily” to Food
I like to take that “gilding the lily” concept and apply it to food. So, I took a plain pumpkin loaf (which is lovely in itself) and jazzed it up beyond the traditional pumpkin spices. It is a prettily marbled pumpkin loaf with additional flavors of grated orange peel and chocolate, including chocolate chips…topped off with an orange glaze. Let’s be honest: all of the gilding makes this recipe more of a dessert … be forewarned and enjoy!
Pumpkin-Chocolate Marbled Loaf with Orange Glaze
By ©Carol Fenster
This loaf makes a decadent, yet delightful addition to a Sunday Brunch or a special family meal … or anytime you want to serve something memorable.
Makes 12 slices
Preparation time: 15 minutes
Baking time: 50 to 60 minutes
2 large eggs, at room temperature
2/3 cup milk of choice, at room temperature
3/4 cup canned pumpkin puree (not pumpkin pie filling)
1/2 cup canola oil
1 teaspoon pure vanilla extract
2 1/3 cups Gluten-Free Flour Blend (see below)
3/4 cup sugar, plus extra for sprinkling
2 teaspoons baking powder
2 teaspoons pumpkin pie spice
1 teaspoon xanthan gum
1 teaspoon salt
1/4 teaspoon baking soda
2 tablespoons cocoa powder (not Dutch)
2 tablespoons chocolate syrup (I use Hersheys)
2 tablespoons gluten-free chocolate chips
1 tablespoon grated orange zest (plus extra for garnish)
2 tablespoons chopped raw pumpkin seeds, for garnish
ORANGE GLAZE
½ cup powdered sugar
1 teaspoon orange juice, or more as needed to create a glaze
[1] Place a rack in the lower third of the oven. Preheat the oven to 375⁰F. Generously grease a 5×9-inch nonstick (gray, not black) loaf pan.
[2] In a large mixing bowl, beat the eggs, milk, pumpkin, oil, and vanilla with an electric mixer on low speed until thoroughly blended. In a medium bowl, whisk together the flour blend, sugar, baking powder, pumpkin pie spice, xanthan gum, salt, and baking soda until well blended. With the mixer on low speed, gradually beat the flour mixture into the egg mixture just until blended. Increase the speed to medium-low and beat until the batter slightly thickens, about 30 seconds. You will have about 4 cups of batter. Transfer 2 cups of the batter to a small mixing bowl, leaving the remaining 2 cups in its original bowl. With the electric mixer, beat the cocoa powder and chocolate syrup into the other bowl on low speed until thoroughly blended to create the chocolate batter. Stir 1 tablespoon of the grated orange zest into the remaining bowl of pumpkin batter.
[3] Spread 1 cup of the chocolate batter evenly in the pan and sprinkle with 2 tablespoons of the chocolate chips. Spread 1 cup of the pumpkin batter on top of the chocolate batter. Repeat the layers, by spreading 1 cup of the chocolate batter, sprinkled with the remaining 2 tablespoons of chocolate chips. Then, spread the final layer of pumpkin batter. Draw a knife through the batter back-and-forth, lengthwise through the pan, to create a slight marbling effect. Sprinkle the top with pumpkin seeds, coat lightly with cooking spray, and sprinkle with a little sugar.
[4] Bake until the top is nicely browned and a toothpick inserted into center comes out clean, about 55to 60 minutes. Cool the bread in the pan on a wire rack for 10 minutes, then remove the bread and cool completely on the wire rack.
[5] When ready to serve, mix the orange juice into the powdered sugar adding more juice as needed to reach a soft consistency that can be drizzled. Using a fork, drizzle the frosting back and forth across the top of the bread to create a decorative effect and sprinkle with the remaining grated orange zest. With a serrated knife or an electric knife, cut into slices and serve. Keep leftovers tightly covered.
Gluten-Free Flour Blend
1 ½ cups sorghum flour or brown rice flour
1 ½ cups potato starch (not potato flour)
1 cup tapioca flour/starch
Whisk ingredients together thoroughly and store, tightly covered, in a dark, dry place.
Per slice: 290 calories; 3g protein; 12 g total fat; 2g fiber; 45g carbohydrates; 32 mg cholesterol; 316mgs sodium
By Carol Fenster, on December 28th, 2016
Black-eyed peas are eaten year-round, but it is believed that they bring prosperity when consumed on New Year’s Day. So bake up a batch of this boldly-flavored Chili, using black-eyed peas rather than kidney or pinto beans…and may good luck rain down on you!!
 Black-Eyed Pea Chili for Good Luck on New Year’s What are Black-Eyed Peas?
Black-eyed peas (also known as cowpeas) are actually beans so you can use them anywhere you might use beans. They get their name from the characteristic “black eye” or black spot on each bean.
You can cook up a batch from scratch, starting with dry beans which will require soaking. Or, buy them canned and be sure to rinse with water in a sieve until the water runs clear to remove excess sodium. You remove nearly 40% of the sodium that way.
Where to Buy Black-Eyed Peas?
Around the holidays, I have found them in stores in pre-cooked form in plastic tubs that only require a 10 minute boil. They’re especially fresh this way, but if all you can find is canned go with that. Again, just be sure to rinse canned beans very well.
Black-eyed peas are full of good things for your body: protein, fiber, folate… and they are low in fat. So, enjoy this coming New Year’s—or anytime!
Black-Eyed Pea Chili
Adapted with permission from 1,000 Gluten-Free Recipes by Carol Fenster (Houghton Mifflin Harcourt, 2008)
Whip up a batch of this flavorful chili and serve it on New Year’s Day to bring good luck throughout the coming year. Plus, you’re doing your body a healthy favor, too. If you want to be authentic, serve this chili with collard greens (whose green color represents money) and cornbread (which represents gold).
2 teaspoons canola oil
1 pound ground turkey
2 teaspoons canola oil
2 cans (14.5 ounces each) black-eyed peas, rinsed and drained
2 cans (14.5 ounces each) petite diced tomatoes with green chiles, including juice
1 can (4 ounces) diced green chiles, drained
1 small onion, peeled and sliced
2 teaspoons chopped fresh oregano or 1 teaspoon dried oregano
1 teaspoon ground cumin
[1/2] teaspoon table salt
[1/4] teaspoon cayenne pepper
4 cups gluten-free, low-sodium chicken broth or vegetable broth
2 garlic cloves, minced
[1/2] cup chopped fresh cilantro, divided
1 cup grated Monterey Jack cheese, for garnish
Per serving: 535 Calories ; 13g Fat; 5g Saturated Fat; 43g Protein; 12g Fiber; 68g Carbohydrates; 352mg Sodium ; 60mg Cholesterol
[1] In a Dutch oven or other deep, heavy pot with a tight-fitting lid, heat the oil over medium heat. Add the turkey and cook until browned, about 7 to 10 minutes. Add the beans, tomatoes, chiles, onion, oregano, cumin, salt, cayenne, broth, garlic and [1/4] cup cilantro.
[2] Cover and cook on medium-low heat for 30 to 40 minutes. Ladle into the soup bowls and serve immediately, garnished with a sprinkle of cheese and the remaining [1/4] cup chopped cilantro.
Makes 8 servings.
By Carol Fenster, on December 21st, 2016
Ever notice how the seasons have their own smell? To me, summer is freshly-mowed grass and barbecue smoke from the patio grill. Fall is fireplace smoke and raked leaves. Spring is gently-warming soil and spring rains. But certain holidays have unique smells, as well.
 Spice Cookies without gluten, dairy, eggs, corn, or soy What do the Christmas holidays smell like?
For me, it is spices―like cinnamon, cloves, ginger, and nutmeg. One whiff and I’m in the holiday mood. This is Christmas week, so these smells are everywhere.
Experts say that we encounter new smells as children, so it makes sense that the experiences we associate with different aromas conjure up childhood experiences.
The moment I smell the heavenly aroma of these spices wafting from the kitchen I am transported to happy times and ready to break out the tree decorations, address holiday cards, and wrap presents.
Gluten-Free, Plus Dairy-Free and Egg-Free, Too!
This cookie is perfect for those who avoid gluten, dairy, eggs, soy, and corn and they are so delicious you can serve them to any holiday guest—or all winter long. Even if you’re an inexperienced baker, these cookies are super-easy and always a success. Don’t be put off by all the spices; they are essential for this incredible flavor.
These sturdy little gems freeze well so if you have any leftovers (fat chance!!) they can be thawed at room temperature. And, they are sturdy so they travel well and will survive the trip to Grandma’s house.
Plus, the sorghum flour and bean flour boost the health profile of this cookie with protein and fiber so you can indulge with a little less guilt. But best of all, their heavenly aroma and marvelous flavor will delight you and your guests! So get in the kitchen and start baking!
Gluten-Free Spice Cookies (without dairy, eggs, corn, or soy)
Adapted from 125 Gluten-Free Vegetarian Recipes by Carol Fenster (Avery/Penguin Group, 2011)
Moist and very flavorful, these cookies are perfect for snacks, cookie exchanges, or dessert for your family. Or, process them into crumbs in a food processor for a pie crust (about 1 ½ cups for a 9-inch crust) that is perfect for a pumpkin cheesecake. Adding the optional black pepper turns them into Pfeffernüsse, a traditional German treat served during the holidays.
½ cup butter or buttery spread
¼ cup molasses (not blackstrap)
¾ cup packed brown sugar
1 teaspoon pure vanilla
1 cup sorghum flour
½ cup bean flour (such as garbanzo/chickpea, black bean)
1 teaspoon ground ginger
1 teaspoon ground cinnamon
½ teaspoon xanthan gum
½ teaspoon freshly grated nutmeg
½ teaspoon ground cloves
¼ teaspoon baking soda
¼ teaspoon sea salt
¼ teaspoon freshly ground black pepper (optional)
2 tablespoons (turbinado or coarse) sugar, for rolling
[1] Place rack in lower third of oven. Preheat oven to 375°F. Line a 9×13-inch metal baking sheet (not nonstick) with parchment paper.
[2] In medium mixing bowl, beat butter, molasses, brown sugar, and vanilla with electric mixer on low speed until well blended. Add sorghum flour, garbanzo flour, ginger, cinnamon, xanthan gum, nutmeg, cloves, baking soda, salt, and black pepper (if using) and beat until well blended.
[3] With #50 (1¼ tablespoon-size) metal ice cream scoop, shape 18 balls, roll each into smooth ball with hands, and then roll in sugar for pretty crinkly appearance. Place 9 of the balls at least two inches apart on the baking sheet.
[4] Bake just until cookies look firm and began to show little cracks on top, about 8 to 10 minutes. Do not overbake. Cool cookies on baking sheet on wire rack for 5 minutes, then transfer to wire rack to cool completely. Bake remaining 9 cookies in same way. Makes 18 cookies.
Per cookie: 130 calories; 2g protein; 6 g total fat; 1 g fiber; 20 g carbohydrates; 14 mg cholesterol; 55 mgs sodium
By Carol Fenster, on December 14th, 2016
Need a last-minute gift? This festive layer-bar is perfect with its chocolate crust and decadent layers. Assemble this easy mix in 3-cup glass jars and store in a dark, dry place until gift-giving time. You can also include a can of sweetened condensed milk, but for your dairy-intolerant recipients you might include a jar of your homemade sweetened condensed milk (see recipe below) or a can of Let’s Do…Organic brand sweetened condensed milk that is made from coconut milk.
 Layer Bar Mix for Holiday Gift-Giving And be sure to include the instructions—printed on a festive recipe card and tied to the jar—so the lucky recipient knows how to prepare this decadent treat. In fact, why not make one for yourself while you’re at it! My version is for Christmas (e.g., candy canes) but you can tailor this to suit the occasion. For a non-Christmas version, I would try butterscotch or peanut butter chips in place of the candy canes.
LAYER BAR MIX IN A JAR
1/4 cup chopped candy canes
1/2 cup semisweet chocolate chips
1/2 cup shredded coconut
1/4 cup chopped pecans
1/2 cup white chocolate chips
3/4 cup crushed GF cookies (such as Pamela’s Dark Chocolate, Chocolate Chunk Cookies or Pamela’s Honey Graham Crackers)
INGREDIENTS TO BE ADDED BY GIFT-RECIPIENT
1/4 cup (1/2 stick) butter or buttery spread, melted
7 ounces (half of 14-ounce can) sweetened condensed milk (see homemade recipe below)
ASSEMBLY INSTRUCTIONS FOR THE GIFT-GIVER
In 3-cup glass jar with screw-top lid (a 24-ounce Classico pasta sauce jar works perfectly), layer ingredients, starting with candy canes and then chocolate chips, coconut, pecans, and white chocolate chips. Spoon crushed cracker crumbs into small plastic bag and place on top of layers. Screw on lid, cover the lid with 6-inch circle of colorful wrapping paper or cloth, tie a festive bow over the paper-covered lid, and affix the recipe card to bow with more ribbon. Store in dark, dry place away from sunlight (so chips don’t melt).
BAKING INSTRUCTIONS FOR THE GIFT-RECIPIENT
Preheat oven to 350⁰F and coat 8-inch square baking dish with cooking spray. Remove cookie crumbs from jar and combine with melted butter. Press evenly into bottom of baking dish. Sprinkle remaining mix ingredients over crumb mixture. Pour sweetened condensed milk evenly on top. Bake until chips are melted, about 20 to 25 minutes. Allow to cool completely before cutting into 16 small bars.
Dairy-Free Sweetened Condensed Milk
Reprinted with permission from 125 Gluten-Free Vegetarian Recipes by Carol Fenster (Avery/Penguin Group, 2011)
Quite often, gluten-free folks are also dairy-sensitive and until recently there was no store-bought version of sweetened condensed milk that is dairy-free. Now, there is Let’s Do…Organic made with coconut milk. If you can’t find it, make this easy version at home. It makes the equivalent of a 14-ounce can of sweetened condensed milk, about 1 ¼ cups.
1/2 cup sugar
3 tablespoons sweet rice flour
1/8 teaspoon salt
1 cup milk of choice (I like So Delicious coconut milk or Living Harvest hemp milk)
2 tablespoons unsalted butter or buttery spread
1 teaspoon pure vanilla extract
[1] In a small, heavy saucepan whisk together the sugar, sweet rice flour, and salt until thoroughly blended. Whisk in the milk until smooth, then add the butter and heat the mixture on medium heat, whisking constantly, until it thickens slightly, about 3 to 4 minutes.
[2] Remove from the heat and stir in the vanilla and butter. Cool to room temperature to thicken a bit more. It is best used at room temperature; can be refrigerated for up to 2 weeks but bring to room temperature again before using. Be sure to keep refrigerated until gift-giving time and tell the lucky recipient that it must be refrigerated.
Half of the Sweetened Condensed Milk recipe: 420 calories; 6g protein; 13g total fat; .5g fiber; 72g carbohydrates; 36mgs cholesterol; 197mgs sodium
By Carol Fenster, on December 6th, 2016
They’re back! Every holiday season, I walk into Starbucks and crave the cranberry bars in the display case. They contain a set of ingredients that I absolutely love.
 Gluten-free Cranberry Shortbread Bars Since I can’t even try them (they are definitely not gluten-free!), I rely on descriptions from family and friends to guide me in the kitchen. These bars call out to me every year, so I just had to develop my own version and it appears in my book 1,000 Gluten-Free Recipes. I named them “Cranberry Shortbread Bars” since they’re based on a shortbread crust. Enjoy!
CRANBERRY SHORTBREAD BARS
Adapted with permission from 1,000 Gluten-Free Recipes by Carol Fenster (Houghton Mifflin Harcourt, 2008)
These bars contain all the flavors I love: cranberries, ginger, white chocolate, and orange, so it’s no secret that I covet them every year when I see them at Starbucks. For each dairy-laden ingredient, I offer a substitute so these bars are GF and DF. Make a pan and share with a friend!
CRUST
¼ cup (½ stick) unsalted butter or buttery spread (Earth Balance)
¼ cup packed light brown sugar
1 teaspoon grated orange zest
1 teaspoon pure vanilla extract
1 cup Carol’s Flour Blend (see below)
1 teaspoon xanthan gum
½ teaspoon ground ginger or 1 tablespoon very finely chopped candied ginger
½ teaspoon salt
1 large egg yolk
¼ cup dried sweetened cranberries, chopped
¼ cup GF white chocolate chips or finely chopped chocolate chunks (King David brand is lactose-free)
FROSTING
1 small package (3 ounces) low-calorie cream cheese or cream cheese alternative (Tofutti or Daiya), room temperature
½ cup powdered sugar
1 teaspoon orange extract
1 teaspoon pure vanilla extract
1 teaspoon fresh lemon juice
2 tablespoons finely chopped dried sweetened cranberries
DRIZZLE
½ cup powdered sugar
1 teaspoon fresh lemon juice
1 teaspoon canola oil and enough water to form thin frosting
Per bar: 140 calories; 1g protein; 6g total fat; 1g fiber; 4g saturated fat; 21g carbohydrates; 25 mgs cholesterol; 101 mgs sodium
[1] Preheat oven to 325°F. Lightly grease 9-inch nonstick pan (gray, not black).
[2] Make the crust: In food processor, combine butter, brown sugar, orange zest, and vanilla and process until smooth. Add flour blend, xanthan gum, ginger, salt, and yolk and process until well blended. Scrape down sides with spatula. Add cranberries and white chocolate chips and process until blended again. With wet spatula, press batter evenly into pan.
[3] Bake 15 to 20 minutes, or just until edges start to brown. Cool bars 10 minutes in pan on wire rack.
[4] Make frosting: Blend cream cheese, powdered sugar, orange and vanilla extracts, and lemon juice until smooth. With spatula, spread frosting evenly over crust and immediately sprinkle with chopped cranberries. Chill bars at least 2 hours.
[5] Make drizzle: Combine powdered sugar, lemon juice, canola oil, and enough water to form thin frosting. Drizzle frosting in thin line back and forth across bars. Chill again 2 hours before serving. Makes 16 small bars.
Carol’s Flour Blend
1 ½ cups sorghum flour or brown rice flour
1 ½ cups potato starch
1 cup tapioca flour/starch
Whisk together all ingredients thoroughly and store, tightly covered, in a dark, dry place.
By Carol Fenster, on November 28th, 2016
Manage Your Blood Sugar with 125 Recipes Plus a 30-Day Meal Plan
by Jill Hillhouse, CNP and Lisa Cantkier, CHN
Lisa Cantkier and Jill Hillhouse are well-known in the gluten-free world, not only in their home country of Canada but also across the U.S. as well. I have worked with Lisa many times through her website at GlutenFreeFind. Lisa and Jill have teamed up to write a new book, The Paleo Diabetes Diet Solution, and Lisa was kind enough to send me a copy.
November is National Diabetes Month, so this book is very timely. I think many of you might be interested in what it has to say.
 Paleo Diabetes Diet Solution Borrowing from the press release, the authors say, “Millions of people are living with diabetes, and many experts believe that the regular consumption of packaged and processed foods is the leading cause of diabetes and other chronic diseases. A paleo diet isn’t a magic bullet, but all the recent research points to the fact that it can effectively manage as well as lower your risk for diabetes.”
The foundation of the paleo diet is fresh, unprocessed grass-fed meat, whole fruit, vegetables, seeds and nuts. It’s a nutrient-dense, low-carb, fiber‑rich diet high in vitamins and minerals. These paleo-inspired recipes will give you the tools you need to manage or reverse high blood sugar levels while enjoying delicious food at the same time.”
The recipes in the book range widely from soups such as Mexican Chicken Soup and Detox Vegetable Soup, to hearty and healthy salads like Taco Salad and Rainbow Roots Slaw with Tahini Parsley Dressing, to mains of Skillet-Grilled Flank Steak with Nut-Crusted Portobello Slices, Zucchini Noodles with Creamy Avocado Pesto and Butter Chicken with Cilantro Cauliflower – not to mention sides like Garlicky Roasted Broccoli and Nori Egg Rolls and satisfying “extras” like Almond Flax Crackers and Soft Serve Coconut Banana Freeze. These paleo-inspired recipes give you the tools you need to manage or reverse high blood sugar levels while enjoying delicious foods.
There is also a 30-day meal plan that is very helpful in guiding newcomers to implement a paleo diet for themselves.
Jill Hillhouse is a Certified Nutritional Practitioner from the Institute of Holistic Nutrition in Toronto. She is a passionate advocate of nutrition education and whole foods eating. Her approach to functional nutrition focuses on each person’s metabolic individuality, which is at the heart of her integrative nutrition and lifestyle coaching. Jill resides in Toronto, ON.
Lisa Cantkier is a passionate Certified Holistic Nutritionist, writer and editor. She is a nutritionist at the Integrative and Functional Medicine Clinic in Toronto, one of the few functional clinics in the city. Lisa resides in Toronto, ON.
By Carol Fenster, on November 1st, 2016
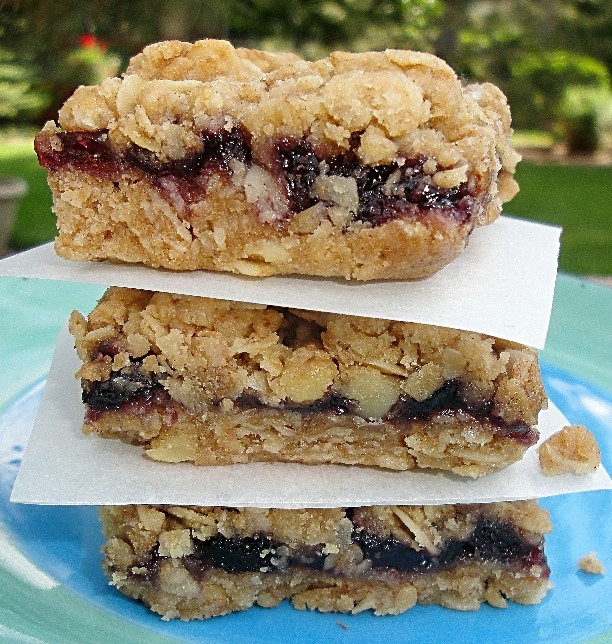
 Vegan oat bars use gluten-free oats and oat bran. Oatmeal. The word invokes images of home, wholesomeness, and all-American goodness. When I was growing up, we ate cooked oatmeal every day for breakfast. Every. Single. Morning.
The only time it differed is when my mother forgot the salt. On rare occasions, she would fry slabs of leftover oatmeal (like a pancake) and we would drizzle homemade maple syrup and melted butter on top. That was a real treat! So, given my background, you can see why oats evoke lots of memories.
There was a time when oats were off-limits for the gluten-free diet because they could be contaminated with wheat. Thanks to several manufacturers we can now buy various forms of gluten-free oats and oat bran that are grown and processed in controlled settings to make them safe for us. So, here is a delicious, easy dessert that uses oats. Enjoy!
Gluten-Free Oat, Blueberry, and Walnut Bars
adapted from 125 Gluten-Free Vegetarian Recipes by Carol Fenster (Avery/Penguin Group, 2011)
Blueberries, cinnamon, and walnuts team up with rolled oats and oat bran to make a hearty, flavorful bar that is also quite versatile. Feel free to change the filling—-it is equally delicious using raspberry, fig, or strawberry jam. Or, use your favorite nuts such as pecans, almonds, or pine nuts. These bars are also vegan and freeze and travel well.
1/2 cup butter or buttery spread, melted
2 teaspoons pure vanilla, divided
1 cup GF Flour Blend (see below)
3/4 cup GF rolled oats*
1/2 cup packed light brown sugar
¼ cup GF oat bran* or ground flaxmeal
1/4 cup walnuts, finely chopped
1 ½ teaspoons xanthan gum
1 teaspoon baking powder
1/2 teaspoon sea salt
1/4 teaspoon ground cinnamon
2/3 cup blueberry jam
*Check with your physician before eating gluten-free oats.
[1] Place rack in middle of oven. Preheat oven to 375°F. Generously grease 8-inch square nonstick (gray, not black) metal pan. Or line pan with aluminum foil, leaving 2-inch overhang for easy removal. Grease foil.
[2] In medium bowl, combine melted butter and 1 teaspoon vanilla. Stir in flour blend, rolled oats, brown sugar, oat bran, walnuts, xanthan gum, baking powder, salt, and cinnamon until thoroughly blended, then press 1 ½ cups of mixture firmly on bottom of pan.
[3] Stir remaining teaspoon of vanilla into blueberry jam until smooth, then spread evenly on top. Sprinkle remaining oat mixture evenly on jam, then pat to make smooth and even.
[4] Bake until top is lightly browned and firm, about 20 to 25 minutes. Cool bars in pan for 30 minutes on wire rack. If using foil lining, invert pan onto large cutting board and remove foil before cutting into 16 squares. Otherwise, serve bars directly from pan. Makes 16 small bars.
Per serving: 175 calories; 2g protein; 7g total fat; 2g fiber;27 g carbohydrates; 16mg cholesterol; 119mg sodium
GF Flour Blend
1 ½ cups sorghum flour
1 ½ cups potato starch
1 cup tapioca flour
Whisk together and store in a dark, dry place.
By Carol Fenster, on October 18th, 2016
Visiting eight European countries around the Baltic Sea in 14 days is an ambitious goal, but that’s what my husband and I did this summer on a Viking Ocean Cruise.
 Viking Ocean Cruise ship From my earlier blogs, you know that I was very pleased with the two Viking River Cruises I took in 2013 and 2015:
a) Christmas Market Cruise on the Main River in Germany from Frankfurt to Nuremberg
b) the Danube River Cruise from Passau, Germany to Budapest, Hungary
The Viking Ocean Cruises began in 2015 and all of their ships are brand-new, luxurious, and offer many amenities (such as a spa, pool, entertainment, heated bathroom floors, etc) that the smaller river ships (barges) cannot offer.
Why Viking?
In addition to my prior experience with the Viking line, the other reasons I chose this Ocean cruise were:
[1] I previously visited only two of the Baltic countries before (Norway and Germany), so this was a chance to also see Denmark, Sweden, Finland, Russia, Estonia, and Poland in one single itinerary.
[2] Viking Cruises handles my gluten-free diet superbly, so I knew I would eat well and safely.
[3] Every cabin on this ship had its own balcony (no port-hole rooms) so they were open and spacious, not claustrophobic. In fact, our cabin was every bit as large as several hotel rooms in the U.S.
The Itinerary
We set sail from Bergen, Norway and continued to Denmark, Germany, Poland, Estonia, Russia, Finland, and Sweden over the two weeks. This was probably one of the most ambitious European trips that we ever did and yes, we were tired. But, we were also excited about seeing a new city in a new country almost every other day. This excitement made it easier to deal with jet-lag, too.
The Food!!
Sightseeing was fun, but eating was even more fun! Cruise ships have an abundance of food, available in multiple restaurants at almost every hour of the day. In fact, if you miss a meal you can always order 24-hour room service to your cabin.
Early on, I met my hero—Restaurant Supervisor Ljupcho Toevksi, a very handsome young man from Macedonia who spoke perfect English. His job was to make sure I ate well. Thanks to his communications with the kitchen staff (over 100 people work in the kitchen to serve 930 passengers) I had delicious whole-grain gluten-free bread (baked daily on-board) at every meal—both sandwich bread and rolls, made from Schar baking mix.
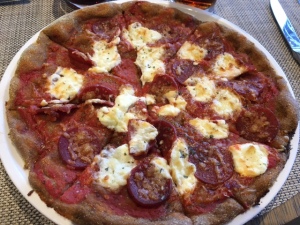
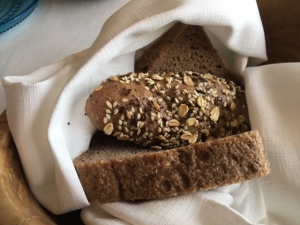 Gluten-Free Bread on Viking Ocean Cruise In addition to bread, which could be used as toast or sandwiches, I also ate gluten-free pizza topped with my choice of toppings. It was so good that I ate an entire pizza myself. They used a bread mix from Schar and then modified it.
I also ate gluten-free waffles and pancakes for breakfast and then they turned the sandwich bread into Eggs Benedict—which was so good that I ate it for three mornings straight.
 Gluten-free pizza There were usually at least one or two gluten-free choices for dessert, often a mousse, pudding, and the usual gelato and sorbets. At Manfredi’s restaurant, I had the most divine Dark Chocolate flourless cake. One of my favorite naturally-gluten-free desserts was the chocolate fondue with fresh fruit. One evening we had chocolate mousse in chocolate cups, which was superb.
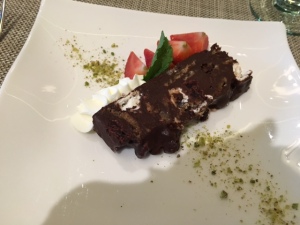 Flourless Chocolate Cake The Process
Every evening, Ljupcho would send the next day’s dinner menu to my cabin. I circled my choices (for appetizer, entrée, and dessert) and returned it to the dining room the next morning. When I arrived for dinner, my server already knew what my choices were and made sure I got the right dish. Of course, I could always eat in the World Café (the buffet restaurant) which was really quite good and had two major benefits: it was super-fast because we could simply choose our food on-the-spot from the vast array of choices and it also gave us a chance to taste a wider variety of different dishes. As we progressed from country to country, the kitchen often featured a dish from that country (e.g., German food when we were in Germany; fish chowder when we were in Denmark).
Yet another advantage to the World Café is that it featured an open-kitchen so there were lots of chefs that I could ask about the contents of any dish. They were all very knowledgeable, but they didn’t hesitate to ask a superior about the dish’s ingredients to make sure I was safe. And, I could watch them prepare my food right there on the spot. For example, they prepared my Eggs Benedict right in front of my eyes so I knew it was safe!
My Tips
The one thing I learned about getting what you want on a cruise ship is that you must pre-order the gluten-free baked goods (except for the bread), because they are not baked unless a passenger asks for it. So, unless you ask for it before-hand (e.g., the pizza, waffle, etc.) you might not get it.
Finally, if you are considering a Viking cruise my advice is to go for it! I found it to be a very comfortable, safe way to see Europe.
By Carol Fenster, on October 11th, 2016
 Enjoy Apples! Fall is here, apples are at their best, and the aroma of apples baking in the oven is both comforting and enticing. Of course, you can make a traditional, two-crust Apple Pie, but here is a super-simple No-Bake Caramel Apple Pie from the Denver Post.
Although the Denver Post recipe is not gluten-free, it will be if you use easy-to-find, gluten-free versions of all the ingredients. Warning: It is extremely decadent, and doesn’t cut into clean slices. You just scoop it onto your plate. But it is so darn good, you won’t care about that!
No-Bake Caramel Apple Pie – What’s In It?
The pie is basically apples cooked with caramels and spices, piled in a crumb-crust (use gluten-free cookies if you can’t find gluten-free graham crackers) and top it with whatever you like: crushed gluten-free cookies, chopped nuts, and mini-chocolate chips were used in the Denver Post recipe. Personally, I like crushed toffee-chocolate bars such as Skor, butterscotch or white-chocolate chips, and then perhaps Pamela’s Ginger or Chocolate cookies. If you plan Halloween wisely, maybe you will have leftover candy for this pie.
Even though the pie is “no-bake” you do have to cook the apples before putting them in the crust. Here are some tips for which apples to use and some secrets to a good apple pie filling. They may not all apply to the above recipe, but will be very useful when you make a traditional two-crust pastry apple pie.
Secrets to Baking Success in Apple Pies
Pre-Cooking the Apples
Cook’s Illustrated magazine says to pre-cook the apple filling before making pies. They recommend simmering the filling ingredients for about 15 to 20 minutes on low heat (or until the apples just start to break down). Apparently, when gently heated (and the key is “gentle,” not to exceed 140°F or you won’t get the desired result), the pectin in apples is converted to a heat-stable form that keeps them from becoming mushy when cooked further in the oven. Who knew?
An added benefit is that our gluten-free pastry pie crusts don’t stand up well to prolonged baking, so pre-cooking the apples helps reduce baking time. Also, precooking the apples shrinks them down a bit and you can fit more apples into the pie crust if you like a really big, high pie (which I do!).
Use a Blend of Apple Varieties
These same experts recommend using a blend of apples in pies, rather than just one variety. Some apples remain firm, others get mushy. Some diminish in flavor from baking, while others actually improve. For baking, they suggest equal parts of both tart and sweet apples…such as Granny Smiths, Empires, or Cortlands for the tarts and Yellow Delicious, Jonagolds, or Braeburns for the sweets.
Sweeteners, Spices, and Flavorings
For sweeteners in pie, use two-thirds white and one-third brown sugar, rather than just white sugar. The molasses in brown sugar adds a hint of caramel that complements apple flavor. Maple syrup or apple cider (reduced to half by simmering over low heat) provide nice flavor, too. A squeeze of lemon and a teaspoon of lemon zest provide acid to highlight flavors and balance sweetness. A quarter-teaspoon of salt heightens flavors.
Spices are such a personal thing; I have a heavy-hand when it comes to spices but you may prefer a milder approach. For some, just a quarter-teaspoon of cinnamon is all they need. Others want more variety, so they add one-eighth-teaspoon ground allspice and maybe a quarter-cup of finely chopped crystallized ginger. For a spicier pie, add one-eighth teaspoon ground cloves, along with the cinnamon and allspice. Or, if allspice isn’t your thing, use the same amount of ground nutmeg. Of course, you can just use apple pie spice (a blend of cinnamon, nutmeg and allspice) and use as much as you like!
Finally, Pastry Pie Crust
Wondering about gluten-free pastry pie crusts? Each of my cookbooks has a no-fail pastry pie-crust recipe. Or, use one of the gluten-free pie crust mixes such as Bob’s Red Mill. For a visual guide to shaping gluten-free pie crusts, see my website for my video on making Pie Crusts.
|
|